Using a passkey as your MFA method

Passkeys offer a high level of security as they are URL, device, and user specific, making them highly resistant to phishing attacks. University faculty, staff, and students are encouraged to create a passkey in Microsoft Authenticator on their mobile device (typically a cell phone) to use as a multifactor authentication (MFA) method to authenticate when accessing university resources.
For more information, see What are passkeys?

Multi-Factor Authentication Policy (UITS)

Step 1: Set up Authenticator

Note: Most university faculty, staff, and students will already have installed and set up Microsoft Authenticator on their mobile device.

You will create your passkey with Microsoft Authenticator so it must be installed on your mobile device (typically your personal cell phone) and configured for your UARK account before you set up the passkey. If you do not have Microsoft Authenticator installed, see our MS Authenticator Setup Instructions

Step 2: Set up Windows Hello

Windows Hello must be set up on any Windows device (such as your laptop or desktop computer) with which you will be using your passkey to log into university services and resources. 

Check to see if Windows Hello is already set up

Check to confirm that Windows Hello is set up on the device that you will be using to access university resources.

  1. Open Windows Settings.
     
  2. Select Accounts on the left.
     
  3. Select Sign‑in options on the right.

    Sign-in options button
     
  4. In the Ways to sign in list, check to see if Windows Hello is set up by clicking PIN (Windows Hello) and confirming that "Change your PIN" and "Remove this sign-in option" are available. If so, Windows Hello is set up on the device, and you can close Windows Settings and go on to the next step

    Change PIN and remove are available so Windows Hello is already set up

    If not, a Set up button will be displayed, and you will need to set up Windows Hello on the device.

Set up Windows Hello

If Windows Hello has not been set up:

  1. Under PIN (Windows Hello), click the Set up button.

    Set up button under PIN (Windows Hello) indicated
     
  2. Click OK on the Use Windows Hello with your Account window.
    You may be asked to authenticate with the MFA method that you are currently using. 
     
  3. Type a PIN into the New PIN field, type the PIN again in the Confirm PIN field, and click OK
    Note: Your Windows Hello PIN must be at least six characters and cannot be a common number pattern. If your PIN doesn’t meet requirements, you will be prompted regarding what to change.

    Set up a PIN window showing New PIN and Confirm PIN fields
     
  4. The "All Set" window will be displayed, indicating that you have successfully set up Windows Hello. Click OK

You can now use your Windows Hello PIN to unlock your device. If you prefer to log on using your password, you can click "Sign-in options" and choose to use your password. 

You may also be prompted for your Windows Hello PIN when logging into university systems. 

Step 3: Create a passkey with Authenticator

You will create the passkey on your mobile device (typically your cell phone) and then use your mobile device to supply the passkey when logging into a university system on another (or the same) device. 

  1. Open the Microsoft Authenticator app on your device (typically your personal cell phone).
     
  2. Tap your University of Arkansas account.

    Authenticator with account indicated
     
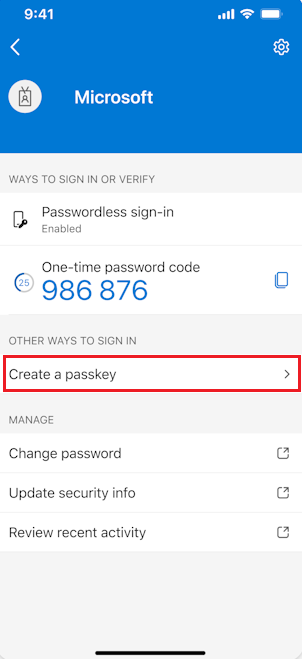
  3. Select Create a passkey.

    Tap Create a Passkey in Microsoft Authenticator
     
  4. Tap Sign In on the Let's create your passkey screen. 
    Note: You may be required to use Microsoft Authenticator to authenticate. 
     
  5. You will be required to authenticate on your mobile device at this time. 
    Enter your mobile device passcode, or if Touch ID has been set up on your mobile device, you may be prompted to authenticate with touch. (This could vary depending on your mobile device authentication method.)
    Note: If you have not set a screen lock on your device, you will be prompted  at this time to open your device Settings and set a screen lock.
     
  6. Click Done in the Passkey Created screen, and you will have successfully set up your passkey. 
     
  7. In your device Settings, confirm that AutoFill Passwords and Passkeys is turned on and that Authenticator is selected.
    • On an iOS 18 device, go to Settings, General, AutoFill & Passwords.
    • On an iOS 17 device, go to Settings, Passwords, Password Options.
    • On an Android device, go to Settings, Passwords & Accounts, and under the Additional providers section, make sure Authenticator is enabled.

Step 4: Sign out of everything

  1. Log into the Security info page.
    Note: You might be required to authenticate using your new passkey (see Step 6)
     
  2. Click the Sign out everywhere link at the bottom of the page.

    Security info window with Sign out everywhere link indicated
     
  3. Click OK on the "Sign out everywhere?" window. 

    Sign out everywhere? window with OK and Cancel buttons
     
  4. Click your account in the Pick an account window. 

    Pick an account window with account indicated

Your account will be signed out of all university resources. 

Step 5: Enroll in Required Passkey group

After setting up your passkey, you will need to self-enroll in the Required Passkey group. 

  1. Log into your Microsoft My Access page.
    Note: You might be required to authenticate using your new passkey (see Step 6)
     
  2. Click Access packages from the My Access section in the left navigation.

    left navigation with Access packages indicated
     
  3. Click View all.

    Access packages page with View all indicated
     
  4. Click Request in the "MFA with Passkey in Microsoft Authenticator" row.

    Request link is indicated
     
  5. Click Continue in the MFA with Passkey in Microsoft Authenticator window that opens. 
     
  6. In the Additional questions window that opens, select Yes to answer "Have you registered passkey in Microsoft Authenticator?", and click the Submit Request button. 
    You should see a green pop-up that lets you know that your request is being processed. 
     
  7. You will receive an email to your UARK email account with the subject line, "You now have access to MFA with Passkey in Microsoft Authenticator" to let you know that you have successfully enrolled in the Required Passkey group.

Step 6: Use your passkey to sign in

Signing into a university system on a computer or other device that does not hold the passkey

  1. Use a browser to sign in to a university resource such as the UARK Help Portal or your Microsoft My Access page.
     
  2. Click on your account from the Pick an account screen.

    Pick an account window with account listed
     
  3. Click Sign-in options from the Sign in screen,
    or
    click into the username field, select your email address from the dropdown, and click Next

    Sign in window with Sign-in options indicatedSign in window with account dropdown
     
  4. If you selected Sign-in options, you will then select Face, fingerprint, PIN or security key from the Sign-in options screen.
    Note: Sign-in options may vary; this screen might look different or not appear, and you will go on to the next step.

    Sign-in options window with Face, fingerprint, PIN or security key indicatedEnter password window with Use your face, fingerprint, PIN or security key instead link indicated
     
  5. Select iPhone, iPad, or Android device from the Choose a passkey screen.
    Note: Your choices could include other options than shown here.

    Choose a passkey with iPhone, iPad, or Android device selected
     
  6. A QR code will be displayed on the computer screen. Use your mobile device with passkey to scan the QR code.

    Scanning QR code with mobile device
     
  7. Click Use Passkey on the Sign In screen. 

    Click Use Passkey
     
  8. You will be required to authenticate on your mobile device at this time. Enter your mobile device passcode, or if Touch ID has been set up on your mobile device, you may be prompted to authenticate with touch. (This could vary depending on your mobile device authentication method.)

Signing into a university system on the phone that holds the passkey

Note: Instructions may vary slightly with different browser apps.
Note: When signing in with a passkey on an iPhone, use Safari, Chrome, or Firefox. Passkey sign‑in may not work when accessing university systems from the Google app or other in‑app browsers.

  1. Sign into a university resource (such as the UARK Help Portal or your Microsoft My Access page) on your phone (or other mobile device) on which you have set your passkey.
  2. Select your account (username@uark.edu) in the Pick an account screen.
    Note: This step may not appear depending on which browser you are using.
  3. Tap Next on the Face, fingerprint, PIN or security key screen.
    Note: This step may not appear depending on which browser you are using.
  4. In the Sign In screen, tap the Use Passkey button. 
  5. Tap the Sign-in options button. 
    Note: Some browsers may not have this step.
  6. Authenticate for your phone. 

Troubleshooting

Contact the IT Services Help Desk by phone at 479-575-2905, submit a support request at help.uark.edu, or visit the Help Desk in person in the Arkansas Union if:
  • You experience difficulties in creating your passkey, setting up Windows Hello, signing out of everything, or enrolling in the required passkey group.
  • If you are unable to log into university resources using your passkey.
  • Your mobile device (phone) with your passkey is lost or broken.
  • You get a new device (phone) and need to set up your passkey on your new device.

For troubleshooting alternate setup scenarios, see Microsoft’s Register passkeys in Authenticator on Android or iOS devices page.

For more information on signing in with a passkey, see Microsoft’s Sign in with passkeys in Authenticator for Android and iOS devices page.